
Planifi Getting started Guide
Contents
Planifi Getting started Guide. 1
Estimate from a Template or prior Project 13
View & Edit Multiple Projects (Project Staffing) 15
View & Edit Employee Work (Assignments) 18
Budget Management in PLANIFI 21
Budgeting Projects in PLANIFI 21
Reviewing Project status in PLANIFI on the Plan tab. 21
Managing Assignment Budgets. 22
Managing Budgets in Project Staffing. 23
Review Project Performance in Project Staffing. 23
PLANIFI PLAN OVERVIEW
Navigation overview
Turn On My Projects and Click Apply if needed. Then Search for and select your project.
View the Project Budget and Actuals by Click the + next to Summary and then click on Dollars.
Click to open the Schedule section and click the button on the right View All Phases to start Scheduling the project.
Check off phases you want to schedule and staff, enter dates or use the calendar drop down to adjust.
You can adjust filters the layout by clicking on the expand and collapse buttons. Note you can search and filter for Employees using the Team dropdown or type to search.
Collapse extra columns, Expand Phase Details, and search for employees. Drag employees onto each phase. Please view the next screen to budget an assignment. Note you can edit the schedule or drag phases to make schedule changes. Generic Resources are also available under the Role tab (to the right of the blue Employee Icon in the resources section).
As you drag an employee on the phase you can change mode to be a total budget or weekly (i.e. weekly would be 20 hours/week over the phase schedule, or 20 total would spread 20 hours over the duration of the schedule). Note you can change the default mode- next section. % Allocation of budget is also available by clicking the 3 dots on the card.
Defaults can be adjusted by clicking the user picture in the lower left corner and choosing profile, then adjust defaults on the Default Values and Personal Tabs.
The three dots in the top right corner provide access to additional dialogs and functions. Most notably the Budget Breakdown which allows users to review the budget detail from the financial system, and the Import from Time Sheets to import time already charged to the project by employees that are not already on the Plan. Note imported employees will be budgeted automatically with the amount of time they have charged to the phase or task.
Filtering & Settings
Every module in Planifi can filter to projects or employees by different properties of the project or employee. Most commonly filter to projects or employees by office/organization/studio (labels may vary by customer). In that area you may filter to any level of your organization and click apply to filter. The first section of the filtering also has common filters like “My Project” which filters the list of projects to only be projects where the current user is the project manager, principal, or project planner. Click apply at the bottom of the screen to load the list of projects or employees based on the current filters.
Filters can be saved and re-used by clicking the down arrow below the filter icon and choose to ‘Add’ to save the current filter, ‘Update’ to update the current filter, or ‘Clear’ to clear the current filter. At the bottom of the list, existing saved filters will be listed, simply click on a saved filter to use it.
Every module in Planifi has a variety of options or settings related to that module. Most common options to adjust options such as, report data weekly or monthly or include unposted time.
Options can be saved and re-used by clicking the down arrow below the filter icon and choose to ‘Add’ to save the current options, ‘Update’ to update the current options, or ‘Clear’ to clear the current options. At the bottom of the list, existing saved options will be listed, simply click on a saved option to use it.
Other Planning Options
Quick Assignments are available by typing the Add new card dialog to search and add new employees.
If you’d like to use the same team on multiple phases, use the copy and paste functionality to copy a team from one phase to another or ALL phases.
Teams of employees can be assigned to a single phase or task by dragging the All Employees card onto a column, or the team can be assigned to all phases by dragging the team onto the area above phase name to assign the team to every phase.
Excel Importing
Excel Templates can be configured in the administrative section that specify the order of fields to import into Planifi. Values include, Phase code, Optional Task code, Employee email address, start date, end date, and hours. Optionally weekly or monthly data can be imported by entering additional columns to the right. The first column is treated as this week or this month, the second column next week, the third is 3 periods from today and so on.
Simply drag the templated data in Excel or CSV format on the plan to import it.
The import dialog allows the plan to be cleared and reimported, and optionally include the weekly or monthly data by enabling the Import time data option.
Editing by hours by Week or Month
Choose Project Staffing to edit employee hours by week or by Month.
Other Features
Deliverables are also available to manage Tasks/Deliverables/Milestone for each project and even employee.
Click the +Flag to add new Deliverables/Tasks/Milestones. If you check Deliverable the End date is the Due Date. Enter the name in the Task Name field, select End date if needed and optionally assign to an employee and provide notes if needed. Note if you check the Deliverable checkbox the item will be visible on the Forecast Tab under Schedule and appear as Diamond/Milestone on the schedule. Deliverables will also show in the Planifi Outlook Integration for PM’s and for Employee’s that have Deliverables assigned to them. Note you can also track % complete on the items as well.
Hover to view each employees’ details, such as Job-to-Date (JTD) Planned (how many hours they were planned AS OF TODAY [not total planned]), and JTD Actual, and Estimate to Complete (ETC) the amount planned for the employee in the future.
View Layouts can be adjusted by clicking the View Layout and choosing Horizontal or using small cards. Phases and tasks can be collapsed in vertical or horizontal layouts as well.
Estimates/Opportunities
Estimates work almost identically to Plans except there is no Project setup in Vision and therefore there is more flexibility in how the Work Breakdown Structure(WBS) or Phases are created. However, if you wish to copy your Plan onto the live project once set up in Deltek it should be ‘mappable’ so that the schedule or team can be copied onto that ‘Live Project’. Note you can also copy the WBS and other elements from another plan or template.
To add phases or work breakdown structures (wbs’s), click the View All Phase button and then click the three dots (…) in the upper right corner.
Click ‘Add New Phase’ to add the new phase.
After you click Add (the three dots next to the Project List) or edit on the three-dot menu in the top right corner the dialog below will appear. Here you can enter a name, select the proper PM, PIC, Client and Office/Org. The probability assigned will weight all assignments, i.e., if the assignment has 100 hours and is weighted at 50% then future projections will show 50hours.
On the Rate tab select the appropriate Billing Method and Rate table for your Estimate.
If you choose to copy from a Template or prior plan search for the Plan/Template on the left, and then on the right search and select your new Plan. Choose any phases you don’t want created in the middle and below check any elements you wish to copy.
Working with Fees
Enter your fee from the top down or bottom-up/phase by phase. % Allocation is available to distribute your top-down fee, be careful not to exceed over 100% or will increase your fee. Also note that reducing your phase fee’s does NOT automatically reduce your total fee, this is to allow you to reallocate/change your budgets while leaving the fee intact. However, if you increase your total phase fees it will increase your top-level fee.
Estimate from a Template or prior Project
Follow the prior steps to create a new Estimate.
From your newly created Estimate click the Export to copy a template structure or prior Estimate or Plan.
If you choose to copy from a Template or prior plan search for the Plan/Template on the left, and then on the right search and select your new Plan. If you want to copy from a prior project, then Turn Show Opportunity Off and search for the prior project and click to select it. Choose any phases you don’t want created in the middle and below check any elements you wish to copy.
View & Edit Multiple Projects (Project Staffing)
Using the settings on the left-hand section, you can filter your projects list by Office/Organization from Deltek, use the My Projects to filter to projects where you are the PM or Principal, or search for projects by a specific PM. Click Apply to load the projects.
View performance metrics at every level, for example Labor Available will show the projected under/over project budget amount, or you can compare Fee with EAC (Estimate at Complete). Click the + to expand and view Phase level metrics and click the + next to the phase to reach the employee level.
Different Schema’s can be used to show and hide different columns based on the metrics you’d like to evaluate or for example to reduce the number of columns in view if you’re editing hours.
Edits can be made from the Projects Staffing screen as well. New assignments can be created by clicking the + Flag. Existing assignments can be edited by clicking the Pencil next to the assignment, this allows you to change the assignment to another employee or refine the time period an employee is scheduled to work. For example, if the employee is scheduled to work on 6-month phase, you could schedule them to only work on the last month. Or select and week or weeks by clicking and dragging and enter a new value.
Expand the resource section and drag to add employees onto projects.
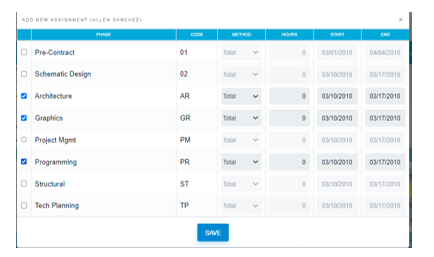
Check off the phases to assign that employee to work on.
View & Edit Employee Work (Assignments)
Using the settings on the left-hand section, you can filter your Employee list by Office/Organization from Deltek, or filter by Supervisor. Click Apply to load the Staff.
Edits can be made from the Assignments screen as well. New assignments can be created by clicking the + Flag. Existing assignments can be edited by clicking the Pencil next to the assignment, this allows you to change the assignment to another employee or refine the time period an employee is scheduled to work. For example, if the employee is scheduled to work on 6-month phase, you could schedule them to only work on the last month. It can also be helpful to review Expected totals against weeks scheduled amounts to understand how above or below target you are.
To edit a week or weeks of scheduled work just click and drag to select the weeks and enter a new value. Any changes will be reflected in updated EAC or Labor Available numbers after the a few moments. For example, if a phase an employee is assigned to work on shows a Labor Available of $10,000 and you increase the number of hours for that employee then the Labor Available will be reduced. It is also recommended to show Budgeted Hours and EAC for employee assignments. This will allow edits to be made in respect to the budgeted hours. For example, if an employee is scheduled for 10 hours a week over 4 weeks and they have a Budget total of 40 hours, you may initially schedule the last 2 weeks for 20 hours which would result in an EAC of 60 hours. Then correct that by changing the first 2 weeks to 0 hours and the EAC and budget will match.
If EAC is greater than budget, then it means the following has occurred:
- To this point in the project more hours were charged than planned
- Or more hours were added to future planned work than budgeted.
- Or both
If the budgeted hours needs to be adjusted for some reason (assignments changed, scope changes, etc.), it’s recommend the change be made on the plan tab so the Budgeted Hours are correct, likewise if hours were reduced for another resource/employee, that change can be made at the same time.
Expand Projects and drag to assign to projects to employees.
After dropping choose which Phases or Tasks to assign to the employe to work on.
Budget Management in PLANIFI
Reviewing Project status in PLANIFI on the Plan tab.
When looking for issues on a project plan the $ sign will be Red if any phase is projected to go over budget.
Reviewing the Schedule & Budget on Contract Documents will show the original budget looks acceptable, however the EAC is $229,459 more than the Fee.
The corrective action would be to review the ETC (future planned efforts) and find any future planned hours that can be reduced and therefore bring the EAC in line with the Fee.
Next reviewing the Planned VS Actual section in Design Development, shows 8,806 hours have been charged to the phase, but only 5,335 were planned to be charged at this point in the project, this shows 3,470 extra hours have been spent. Meaning either the project is ahead of schedule or trending to go over budget.
Review Project Performance in Project Staffing
On the Manage – Project Staffing tab you review forecasted project performance across projects on a single screen. Planifi recommends reviewing the JTD Charges, ETC (Estimate to Complete/Future planned efforts), EAC (Estimate at Complete/JTD+ETC), Fee, and Labor Available (FEE-EAC). The Labor Available is a single metric to understand if a project is projected to go over or under budget, it’s also useful to review projects with excessively high Labor Available which likely indicates the project has not been planned correctly. Likewise, the EAC will show where the project is projected end up as well, and when comparing that to the fee you can see anything from missing Fee’s, or Fee’s that should include Additional Services. JTD and ETC offer some insight about how much has been spent and gauge if too much or not enough works has been done, and ETC can help understand if too much or not enough work is still Planned.
Planifi Definitions
Budgeted Hours: The total hours that are provided by the planner on initial entry or on change of total or weekly amount of hours (changes to week by week or month by month do not update the budget), or budget values can be edited by clicking edit on the employee card. If weekly is used the budget is the scheduled # of weeks X weekly value.
JTD: The actual hours spent at this point in the phase regardless of budget or schedule, from vision.
JTD-planned: Show hours the how that were planned to have spent as of today. For example, if a phase is scheduled for 10 weeks and you have budgeted someone for 100 hours and your 4 weeks into the project then your JTD Planned 40. If you’re 6 weeks the JTD Planned 60 hours. Note this does account for uneven spreads, meaning if the PM entered 40 hours to be worked the first week, then that will be accounted for in JTD Planned.
JTD & JTD-Planned use: Compare JTD & JTD-Planned to show if you’re project or phase is being over or underworked. For example if a phase is scheduled for 10 weeks and you have budgeted 1000 hours and your 4 weeks into the project then your JTD Planned 400 and your JTD is 500 then hopefully your ahead of schedule, but it could indicate you’re 100 hours over worked, or 100 extra hours were charged over what you expected.
ETC: this is automatically generated by planifi and is the remaining hours at the current point in time. For example, if a phase is scheduled for 10 weeks and you have budgeted someone for 100 hours and your 4 weeks into the project then your ETC is 60. If you’re 6 weeks the ETC will be 40 hours. Note this does account for uneven spreads, meaning if the PM entered 40 hours to be worked the last week, then that will be accounted for in ETC.
EAC: the sum of ETC plus JTD (actual)
Planned Profit is the EAC (JTD from Vision + ETC[Future planned effort]) at the Planning Rates - EAC(JTD from Vision + ETC[Future planned effort]) at the specified Overhead rate. We do cap the earning at the fee and subtract over fee spend at the overhead rate as well. An unplanned budget does not contribute to Planned Profit, meaning if you’ve got $100,000 fee and have planned $80,000 of effort, the unplanned $20,000 is not included in the Planned Profit calculation. If EAC is greater than Fee, then the overage amount is subtracted from Profit at Overhead (not Bill Rate).